Photography Guide · From Beginner to Advanced

What Is Aperture? Depth of Field, Bokeh, and Light Control

The aperture is not merely an opening that illuminates the photograph. It is one of the fundamental creative tools that collectively determine exposure, depth of field, bokeh character, lens sharpness, diffraction, and the appearance of point light sources.
5 main sections + bonus About 18 minutes Beginner → Advanced Updated: July 14, 2026
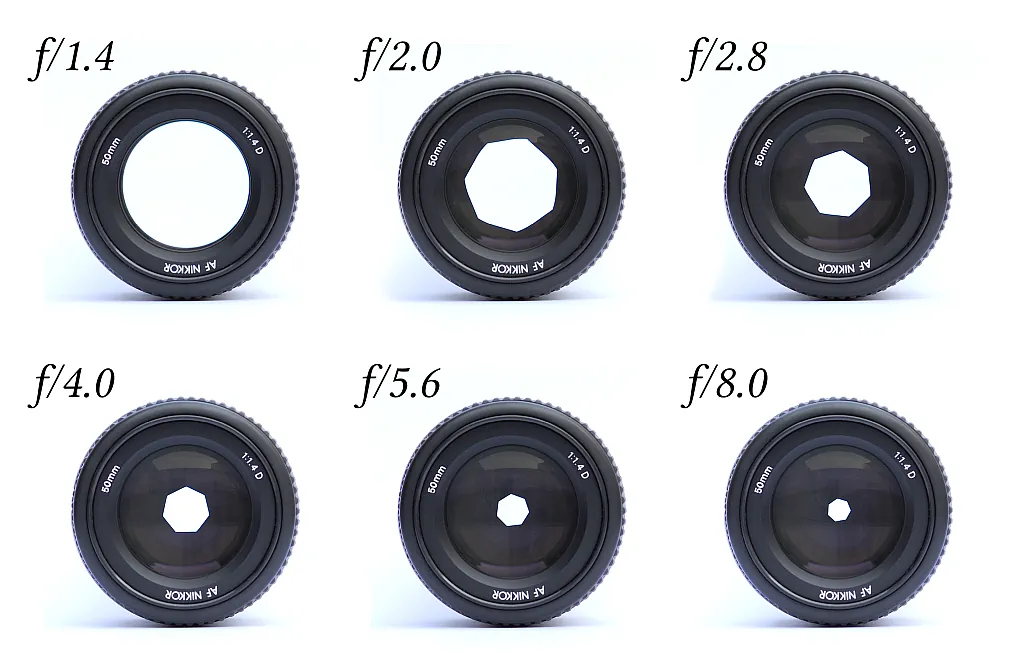
A photography aperture chart showing different aperture sizes and f-stops
Small f-number = wide aperture f/1.4, f/2, and f/2.8 let in more light; f/11, f/16, and f/22 let in less light.
Exposure Every full stop light changes twice.

Changing the aperture from f/2.8 to f/4 cuts the amount of light in half; changing it in the opposite direction doubles it.

Depth of field As the opening gets larger, the clear area generally shrinks.

Conclusion: It is determined by the subject distance, framing, focal length, and sensor format.

Optical quality The smallest aperture doesn't always produce the sharpest results.

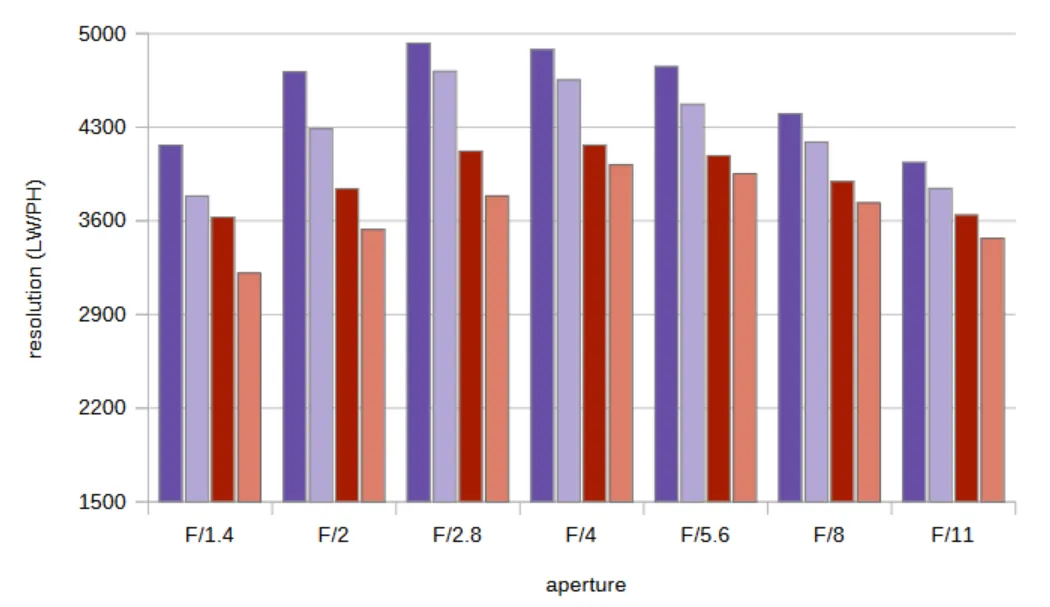
Diffraction can soften details at small apertures; the “sweet spot” varies depending on the lens.

Creative look Bokeh and the starburst effect are influenced by the aperture geometry.

The number of blades, the blade shape, and the optical design determine the characteristics of the out-of-focus regions.

What does this guide address?

We view the aperture not as a sequence of numbers to be memorized, but as a decision that governs the technical and psychological structure of the image.

Basic equation

The f-number is approximately equal to the lens’s focal length divided by the diameter of the exit pupil. For example, a 50-mm lens at f/2 has an effective aperture of approximately 25 mm in diameter.

Chapter 1

Aperture, f-number, and depth of field

Let’s first clarify the physical principles behind aperture, and then how this aperture interacts with exposure and depth of field.

f/N focal length / aperture diameter
What is the diaphragm?

It is the aperture that controls the size of the light beam reaching the sensor through the lens.

The aperture blades inside the lens open and close to change the entrance aperture. The analogy with the pupil is helpful as a starting point: it dilates in the dark and constricts in the light. In photography, however, this change affects not only the amount of light but also the width of the depth of field and the shape of the out-of-focus areas.

A comparison showing how the pupil contracts and dilates in light and dark conditions
The "pupil" analogy The principle that an aperture becomes smaller in bright light and larger in dark light explains the basic function of the diaphragm.
The physical aperture sizes of lenses that vary at different f-stops
The f-number works in reverse As the number gets smaller, the gap gets larger; as the number gets larger, the gap gets smaller.
f/1.4the most light
f/21/2 light
f/2.81/4 light
f/41/8 light
f/5.61/16 light
f/81/32 light
f/111/64 light
f/161/128 light
f/221/256 light
f/1.4

Wide aperture

More light, a shallower depth of field, and, in most cases, more pronounced background separation. It is used for portraits, low-light photography, and selective focus.

f/16

Small aperture

Less light, greater depth of field, and the potential for a starburst effect with point light sources. This can be used in landscape, architectural, and multi-layered scenes.

Effective depth

It is the area in front of and behind the point you have focused on that appears “in focus.”.

Depth of field is not the same thing as sharpness. The plane of sharpness is, in theory, a single plane; depth of field, on the other hand, defines the area that is perceived as sufficiently sharp depending on the viewing angle, print size, and viewing distance.

  • A wide aperture generally reduces the depth of field.
  • A small aperture generally increases the depth of field.
  • As you get closer to the subject, the depth of field decreases dramatically.
  • The distance of the background significantly alters the appearance of the blur.
An example showing how the depth of field and background blur change as the aperture changes.
FACTOR 01

Diaphragm

A small f-number tends to produce a shallower depth of field, while a large f-number tends to produce a greater depth of field.

FACTOR 02

Subject distance

As you get closer to the subject, the depth of field narrows. This is why macro shots have areas of sharp focus measured in millimeters.

FACTOR 03

Focal length and framing

A long focal length and a close-up composition magnify the background, making the blur more noticeable.

FACTOR 04

Sensor format

For the same frame and perspective, a large format can produce a shallower depth of field because it requires a longer focal length.

The blurriness in phone photos isn't entirely “fake.”.

Even phones with small sensors can produce true optical bokeh in close-up shots. The strong background separation seen in portrait mode, however, is mostly supported by depth mapping and computational photography.

Photos: Burak Bulut Yıldırım The following selection consists of works I have shot over the years and for various professional projects as the author of this guide.
Chapter 2

Bokeh, sharpness, aberration, and diffraction

When the aperture changes, it’s not just the depth of field that changes; the lens’s image character and technical performance also change.
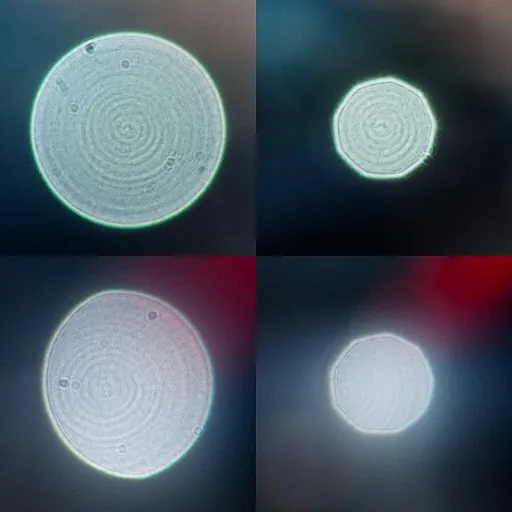
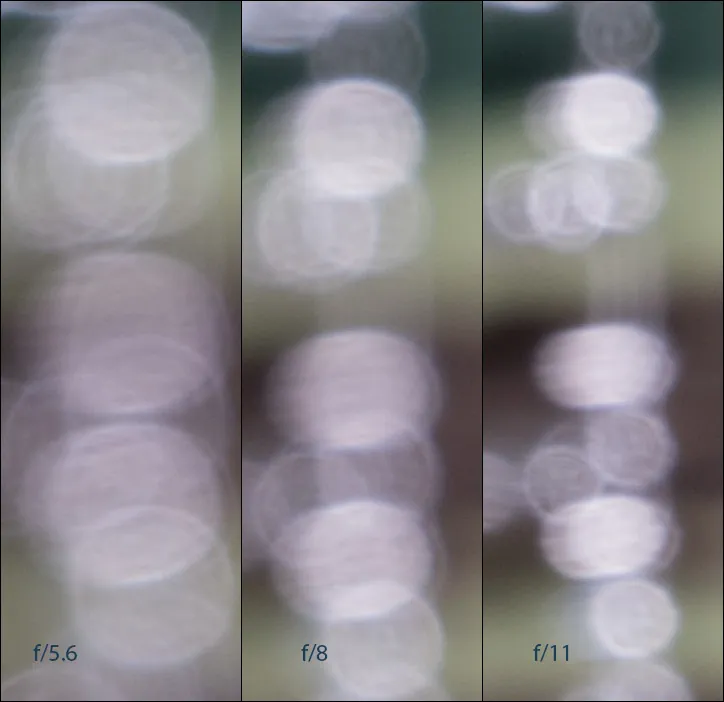
Differences in shape and texture created by different lens designs in bokeh discs
Bokeh discs can appear round, polygonal, onion-ring-shaped, or cat-eye-shaped toward the edges.
What is bokeh?

Bokeh is not the “degree of blur,” but rather the visual quality of out-of-focus areas.

The number and curvature of the diaphragm blades are important, but they are not the only determining factors. Spherical aberration correction, the surface structure of aspherical elements, optical vignetting, and the texture of the foreground and background also affect the bokeh character.

Roundness The shape of the aperture formed by the blades when the diaphragm closes.
Tissue Onion rings, double lines, and color fringing within the bokeh disk.
Border style “Cat's eye”—an effect that can occur at the edges of the frame due to optical vignetting.
Transition Whether the transition from the in-focus area to the out-of-focus area appears sharp or soft.
Sharpness

The "sweet spot" is not a fixed rule

Many lenses balance center and corner performance when stopped down by 1–3 stops from wide open. However, modern lenses can be very powerful at wide open; the optimal setting varies depending on the model, focal length, and focusing distance.

Aberrations

Adjusting the aperture can reduce certain optical defects

Vignetting, spherical aberration, coma, and some chromatic aberrations may decrease when the aperture is stopped down. Conversely, background sharpness and light-gathering capacity also decrease.

Diffraction

A very small aperture softens the details

Diffraction occurs at all apertures; its effect on the image becomes more noticeable at small apertures. High-resolution sensors may reveal this softening sooner.

Why isn't f/22 always the solution?

As depth of field increases, microcontrast and fine detail may be lost.

When photographing products, jewelry, and macro subjects, rather than closing the aperture all the way to show the entire subject in focus, shooting at a medium aperture with multiple planes of focus and applying focus stacking often yields more controlled results.

  • First, test your lens's performance at f/5.6, f/8, and f/11.
  • Adjust the depth of field as needed by adjusting the shooting distance and camera angle.
  • Use focus stacking for stationary subjects and find an appropriate compromise for moving scenes.
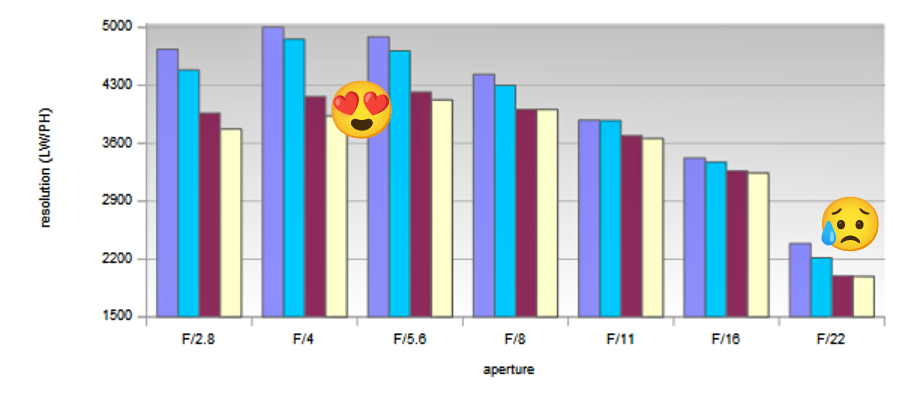
A comparative diagram illustrating the loss of detail due to diffraction at a small aperture
The diffraction effect is visible to varying degrees depending on the sensor, resolution, output size, and lens.
Chapter 3

How do light sources appear through a diaphragm?

Lens flare, volumetric light rays, and the starburst effect are distinct optical phenomena. The aperture affects each of them in a different way.

Lens flare

It is an internal reflection within the lens

When a strong light source enters the lens directly or at an oblique angle, reflections and a loss of contrast may occur between the lens elements. The shape of the aperture can affect the flare pattern; the main factors are the angle of the light, the coatings, and the optical design.

Light beam

It becomes visible due to particles in the air

When fog, smoke, dust, or moisture scatters light, volumetric light streaks become visible. The brightness can affect the perception of the beam’s sharpness and spread; the primary condition for the beam’s formation is the presence of a scattering medium in the environment.

Star Effect

It is diffraction at a small aperture

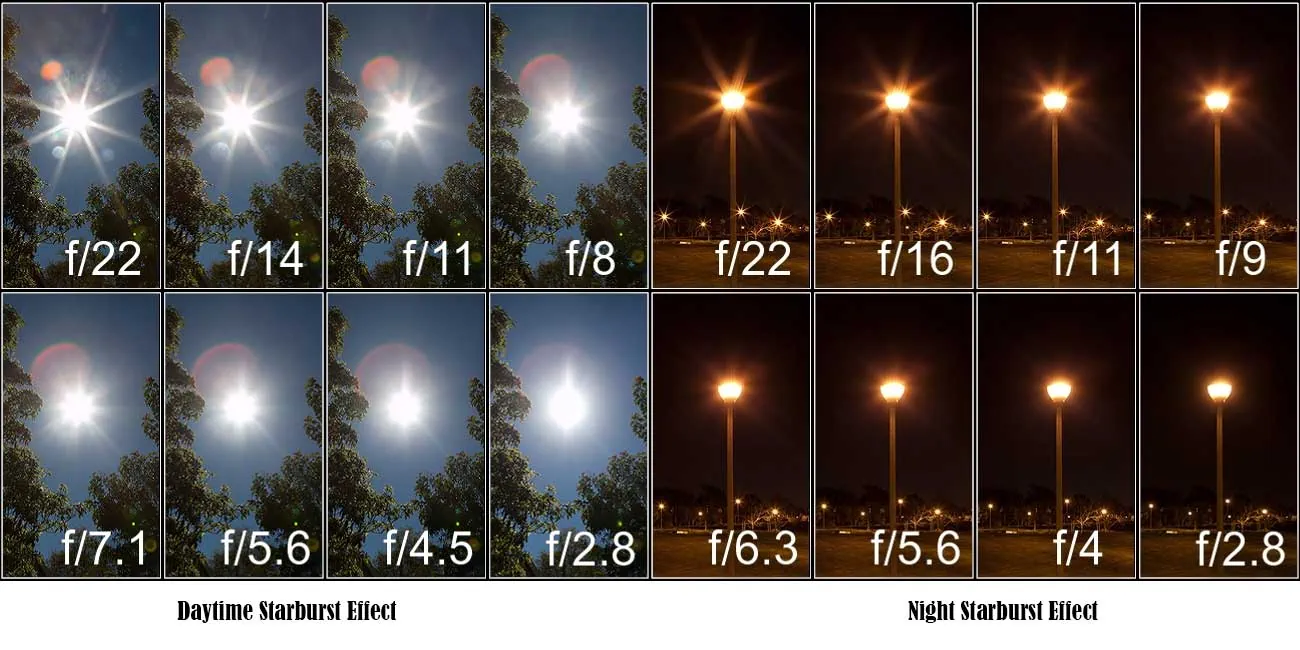
Point-like, bright light sources—such as the sun, a streetlight, or a small reflection—may take on a star-like shape at f/11–f/16. The ideal setting varies depending on the lens and the scene.


The intense sunlight and atmosphere visible around the person sitting on the hilltop at sunset
Atmosphere and Backlighting The position of the light source, the atmosphere, and the exposure all work together.
An example of a colored lens flare created by a direct light source on the lens
Creative flare When used sparingly, it can add depth and atmosphere to an image.
A comparison showing how a point of light transforms into a star-like effect at different aperture settings
When the point of light remains small, the star's arms appear more distinct.
How many arms does a star have?

The result depends largely on the number of diaphragm blades.

An even number of blades typically produces as many star-shaped spokes as there are blades. With an odd number of blades, since the spokes do not overlap directly opposite each other, the number is usually doubled: 7 blades can form approximately 14, and 9 blades can form approximately 18 spokes.

Eye and Sensor Safety During Solar Photography

Do not look at the sun through the optical viewfinder. Frame your shot quickly using the electronic viewfinder or the screen; pointing the camera directly at the sun for an extended period can damage the equipment.
Next module: Advanced Techniques and Applications Hyperfocal distance, MTF, T-stop, custom bokeh, focus stacking, Sony lens technologies, and SSS.
Go to Chapter 4
Chapter 4

Advanced knowledge of the diaphragm and lenses

Hyperfocal distance, MTF charts, and T-stop allow you to use the aperture not only as a creative tool, but also as a measurable technical decision.

Hyperfocal distance

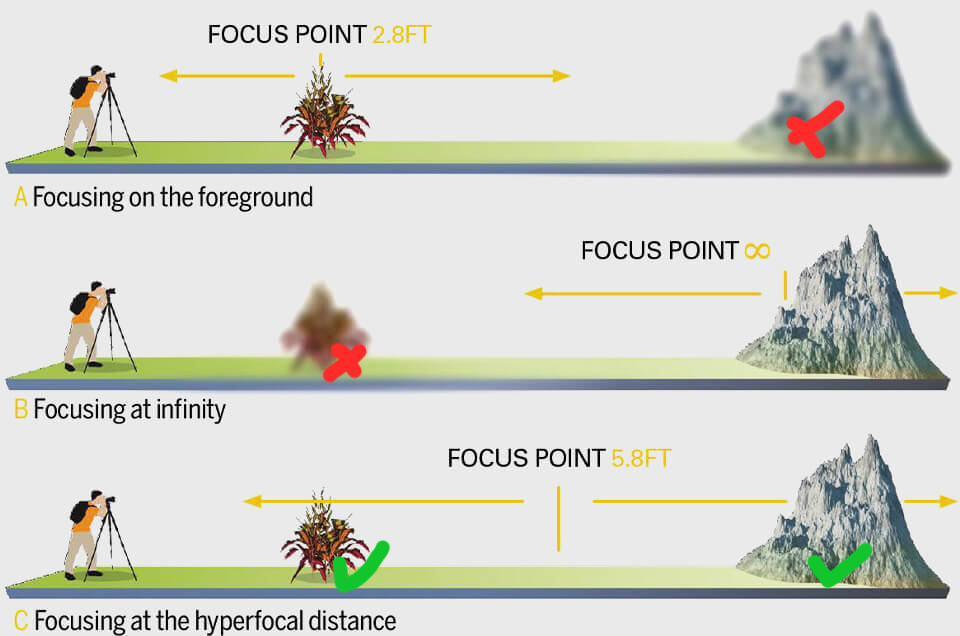
At a given focal length and aperture, it is the closest focusing distance at which infinity remains in acceptable focus.

When you focus on the hyperfocal point, the acceptable depth of field extends approximately from half this distance to infinity. It is used in landscape, architectural, and wide-angle environmental photography to capture both the foreground and the background clearly.

H ≈ f² / (N × c) + f H: hyperfocal distance · f: focal length · N: f-number · c: accepted circle of confusion

The formula is not a strict “clarity threshold,” but rather an acceptance model based on the selected output size and viewing distance. For practical calculations The DOFMaster calculator You can use it.

A diagram showing the hyperfocal distance, the focus point, and the boundaries of the near and far fields of depth
The hyperfocal calculation provides a starting point, especially for wide-angle lenses and when the camera position is fixed.
An MTF graph showing contrast and resolution performance from the center to the corner in a simplified format
This visual is a simplified illustration; manufacturers' MTF presentation formats may vary.
MTF chart

It is used to measure the lens's contrast distribution from the center to the corners.

MTF is an abbreviation for Modulation Transfer Function. Low spatial frequency lines represent overall contrast, while high-frequency lines represent the rendering of fine details. The separation of sagittal and meridional lines can provide clues about astigmatism and bokeh character.

  • Manufacturer charts are often based on theoretical data or a specific sample.
  • Not every chart shows all aperture settings; most show only the fully open setting and, sometimes, values like f/8.
  • Graphs from different brands should not be compared directly if they were not produced using the same method.
  • Real-world performance should be evaluated in conjunction with the focusing distance, sample variation, and the sensor.

For multi-diaphragm laboratory measurements OpticalLimits and ePHOTOzine Test resources like these can be helpful.

F-stop and T-stop

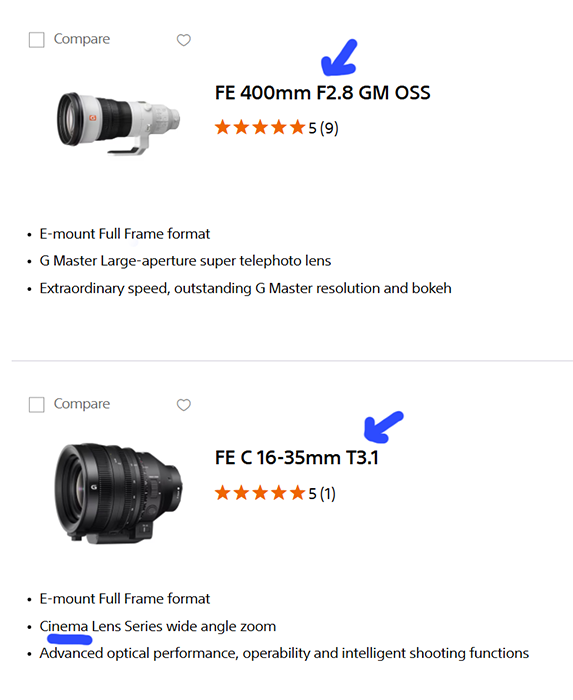
The F-stop represents the geometric aperture, while the T-stop indicates the actual amount of light passing through the lens.

Two lenses with the same f-number may not deliver exactly the same amount of light to the sensor due to losses in the glass elements and coatings. The T-stop standardizes the actual exposure value by measuring this transmission loss.

Photo.

The f-stop is sufficient

When working with a single camera and a single lens, the light meter and automatic exposure compensation account for minor differences in transmission.

Movies

The T-stop is important

To maintain consistent exposure across shots taken with different lenses, accurate light transmission is required.

To compare objective transmission measurements DxOMark lens tests you can take a look.

A diagram illustrating the difference between the theoretical aperture and the actual light transmission between F-stop and T-stop
A lens's T-value is usually slightly higher than its f-value.
Creative application

How do you create custom bokeh with unique shapes?

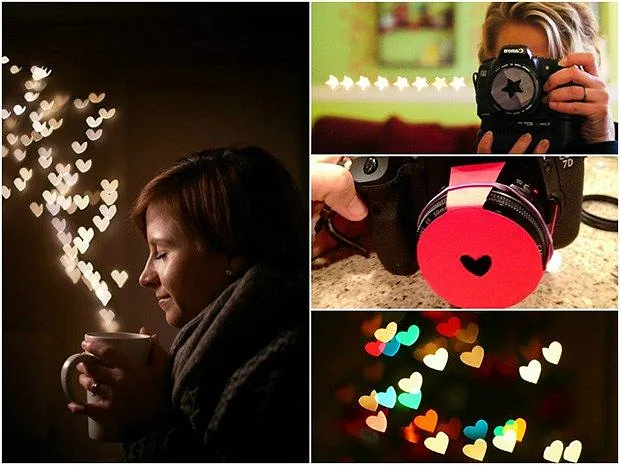
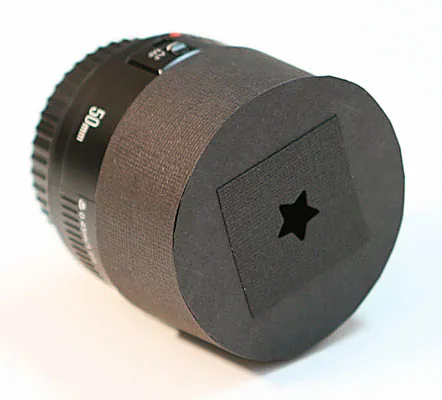

A shaped mask placed in front of the lens makes out-of-focus point lights appear as hearts, stars, or other silhouettes.

Choose a lens with a wide aperture

Lenses such as the 50 mm f/1.4, 50 mm f/1.8, or 85 mm make the process easier.

Cut a circular mask out of black cardboard

The outer diameter of the mask should cover the front of the lens; the shape at its center should be smaller than the actual aperture.

Center the shape exactly on the optical axis

Off-centering a heart, star, or letter shape can produce asymmetrical and cropped bokeh.

Position the camera toward the subject, and adjust the lighting accordingly

As the distance between the subject and the background increases, the shaped bokeh becomes more pronounced.

Test with manual focus and the aperture fully open

Adjust the brightness of the lights using the focus distance, focal length, and the position of the camera relative to the background.

How small should the opening in the mask be?

The shape should be smaller than the lens’s effective aperture at that f-number. If you make it too small, you’ll experience significant light loss and vignetting; if you make it too large, the bokeh shape won’t be distinct.

The easiest scene

A dark setting, a warm LED light strip, a portrait subject close to the camera, and a long distance in the background.

A tutorial video created for the Burak Bulut Yıldırım Photography School’s 2015 end-of-year custom bokeh event.

Chapter 5

Focus stacking: a wider depth of field without sacrificing sharpness

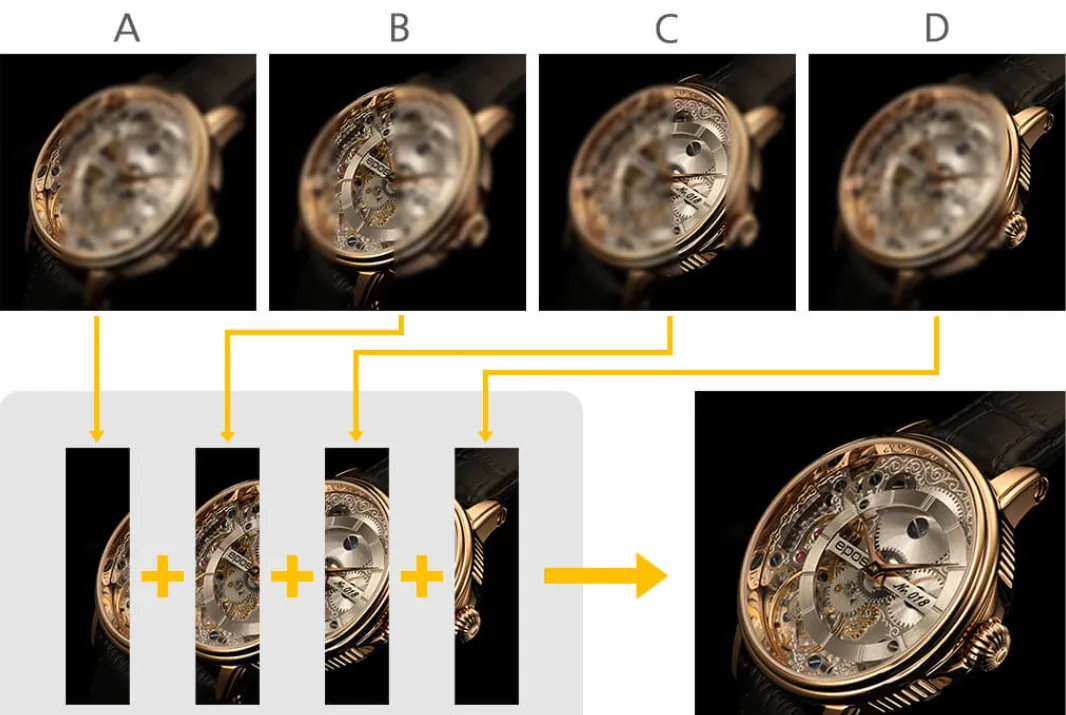
By combining the in-focus areas of photos taken at different depth-of-field levels, you can create a wider depth of field in a single photo than would otherwise be possible.

A focus stacking diagram illustrating how images taken at different focal planes are combined to create a single, fully in-focus photograph
Focus planes are scanned at regular intervals from front to back and then combined.
When is it used?

For jewelry, watches, cosmetics, small items, food, nature macro, and staged landscape photography.

As macro magnification increases, the depth of field can drop below one millimeter. Stopping down the aperture to f/22 may increase the area in focus but can also soften the details. Focus stacking allows you to work at a medium aperture where the lens performs best.

  • The camera and subject must be steady; use a sturdy tripod.
  • Choose manual exposure, a fixed white balance, and a fixed light setting.
  • Take focus steps from the nearest point to the farthest point.
  • If you're using a flash, add the flash recharge time to the shooting interval.
  • Combine them using Photoshop, Helicon Focus, or Zerene Stacker.
Shooting

Leave some overlap

In each frame, a portion of the previous focus area must be retained; otherwise, soft gaps may appear in the composite image.

Movement

Wind and reflection are risks

Leaves, hair, liquids, clock hands, or moving reflections can cause “ghosting” and masking errors.

Perspective

Check your focus breathing

If the frame size changes as the focus changes, the software must perform alignment and scaling adjustments.

Focus Bracketing on the Sony α7R V

The camera can take a series of 2–299 frames by automatically shifting the focus position; the step size can be set between 1 and 10. This function does not create a merged final file on the camera: the captured frames are later combined using focus-stacking software. For details, The official Sony α7R V support page you can examine.

Bonus Section

How do Sony lens technologies affect aperture performance?

Bokeh isn't determined by the f-number alone. The manufacturing precision of aspherical elements, low-dispersion glass, spherical aberration control, and aperture geometry all work together.

XA · Extreme Aspherical

Resolution and bokeh control at wide apertures

XA elements, which feature high surface precision, are designed to reduce spherical aberrations and certain aspheric surface artifacts. Depending on the design, corner performance, point light transmission, and bokeh disk texture may improve.

ED · Extra-low Dispersion

Reducing longitudinal and lateral color fringing

ED and Super ED glass elements control the separation of different wavelengths at the focal plane. This can reduce the purple/green fringes that occur, particularly along high-contrast edges and in out-of-focus areas.

11-blade circular diaphragm

More rounded out-of-focus highlights

Curved blades are designed to keep the aperture close to a circle until it is stopped down a few stops from its maximum. This can produce more natural bokeh by delaying the transformation of point light sources into polygons.

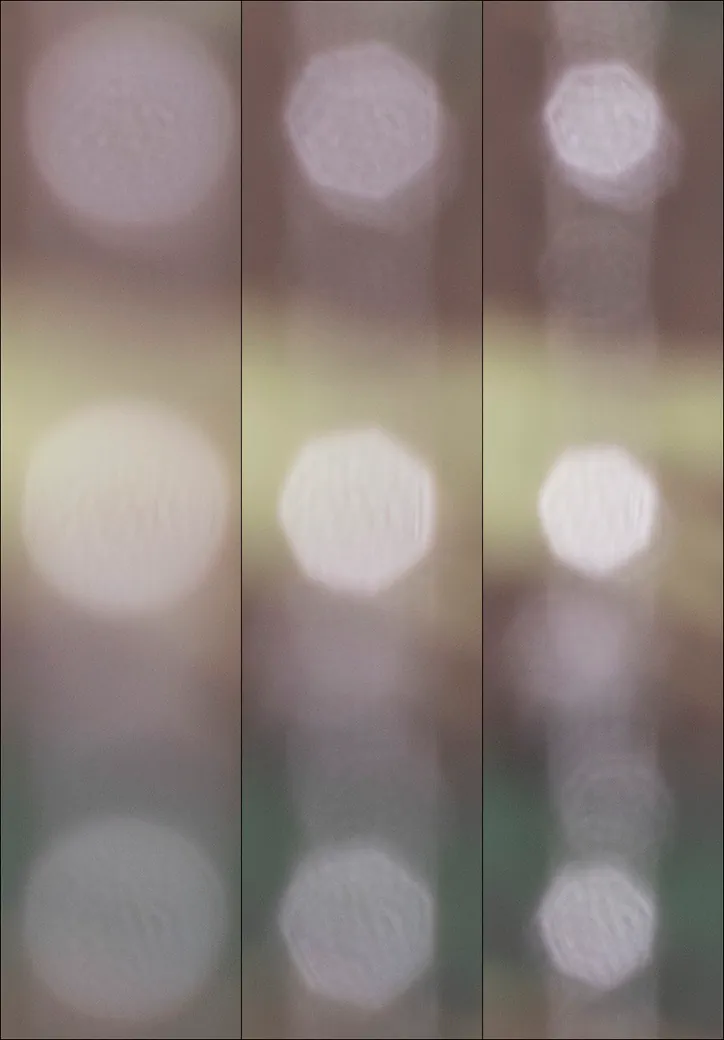
A comparison showing the effect of a circular aperture versus a square aperture on the shape of the bokeh
Curved blades help keep the opening close to a circle.
Circular diaphragm

Having 7, 9, or 11 blades alone is no guarantee of quality.

The angle of the blades, the shape they take as the aperture is stopped down, optical vignetting, and the lens’s spherical aberration correction should all be evaluated together. Good bokeh is as much about round light discs as it is about the natural transition from sharpness to blur.

For a technical explanation Sony Alpha Lens Elements and Circular Aperture Page you can examine.

Technical comparison showing the circular aperture design and bokeh shape in Sony lenses
Maintaining the circular opening When the diaphragm is narrowed, the degree to which the light disks become polygonal varies depending on the design.
An example of an affordable lens that produces more angular and sharp bokeh discs
Example of angular bokeh The blade shape and optical design make the geometry of the light points visible.
A lens comparison photo showing hard edges and irregular bokeh patterns in out-of-focus areas
Optical character The edge sharpness and internal texture of the bokeh disk vary from lens to lens.
A creative portrait photo taken in Berlin with a Sony 50 mm f/1.2 GM lens at an f/1.2 aperture
Sony FE 50 mm F1.2 GM · f/1.2 Berlin, 2024. An example of subject isolation and a soft background blur achieved with a wide aperture.
Practical Usage Chart

What aperture should I start with for each shot?

The values below are not set-in-stone guidelines, but rather reliable starting points. Conduct test shots based on the lens, sensor, distance, output size, and aesthetic goal.

Type of shotStarting rangeWhy?Points to Note
A portrait of one personf/1.4–f/2.8Subject separation and soft backgroundIn a close-up shot, if the two eyes are not on the same plane, one of them may be out of focus.
Group portraitf/4–f/8Keeping multiple faces in focusPosition the people on the same plane as much as possible.
Studio product photographyf/8–f/11Balance between product volume and overall sharpnessFor very deep subjects, a specific camera angle or focus stacking may be required.
Jewelry and macrof/5.6–f/11 + stackingMinimizing diffraction while preserving detailThe combination of movement, reflection, and focus breathing makes it more challenging.
Sceneryf/8–f/11Center-corner performance and sufficient depth of fieldIf the foreground is very close, consider using the hyperfocal distance or focus stacking.
City at Night / Star Effectf/11–f/16Star rays in point lightsA tripod is needed for long exposures; a test is required for diffraction.
Video portraitf/1.8–f/4Cinematic separation and controllable sharpnessAn ND filter may be needed outdoors to maintain the shutter speed.
A / Av mode

Aperture Priority

"A" on Sony and Nikon, "Av" on Canon. You set the aperture; the camera automatically sets the shutter speed. It works quickly with ISO Auto and a minimum shutter speed limit.

M mode

Manual exposure

It maintains consistent lighting for studio, flash, product, and video shoots. Aperture, shutter speed, and ISO are controlled independently of one another.

Test method

Take a series of shots of the same scene

Tripodla f/2.8, f/4, f/5.6, f/8, f/11 ve f/16 çekip merkez, köşe, bokeh ve difraksiyonu %100 görünümde karşılaştırın.

Frequently Asked Questions

Short and Clear Answers About the Diaphragm

A summary of the guide to help you quickly implement key decisions during filming.

What is the diaphragm?
The aperture is the opening inside the lens that controls the amount of light reaching the sensor. It affects exposure, depth of field, the shape of the bokeh, and certain optical effects.
Why does a smaller f-number mean a wider aperture?
The f-number is the ratio of the focal length to the effective aperture diameter. As the denominator increases, the result decreases: a 50-mm lens has an f/2 aperture at approximately 25 mm and an f/4 aperture at approximately 12.5 mm.
Which aperture is the sharpest?
There is no single universal value. Stopping down 1–3 stops from the wide-open aperture of many lenses yields excellent results; modern lenses can be very sharp even at wide-open aperture. Test your own lens at different distances.
Is it wrong to use f/22?
It’s not wrong; it can be useful when you need a wide depth of field or a pronounced starburst effect. However, since diffraction can soften fine details, it’s important to compare it to the f/8–f/16 range.
Are "bokeh" and "background blur" the same thing?
Not exactly. The amount of blur refers to the degree of defocus; bokeh, on the other hand, describes the aesthetic quality, gradations, shape, and texture of the out-of-focus area.
What aperture should I use for a portrait?
For a single subject and a distinct separation, f/1.4–f/2.8 is a good starting point. For very close-up portraits or when there are multiple faces, f/4–f/8 may be a safer choice. Distance significantly affects the resulting depth of field.
Can phones produce true depth of field?
Yes. Physical optical blur occurs, especially in close-up shots. The greater separation in Portrait mode is mostly supported by sensor data and a computational depth mask.
Why is "F-stop" used for photos and "T-stop" for videos?
F-stop is the geometric ratio of the aperture; T-stop measures the actual light passing through the lens. In filmmaking, T-stop is more consistent for matching the exposure of shots taken with different lenses.
What is the best camera mode for learning about the aperture?
Aperture priority mode is the most practical place to start: it’s labeled “A” on Sony and Nikon cameras and “Av” on Canon cameras. You select the aperture, and the camera sets the shutter speed. Manual mode is more suitable for studio and off-camera flash photography.
During his studio photography training, Burak Bulut Yıldırım is working with a model in a red dress and large softboxes
Author and instructor

Burak Bulut Yildirim

An award-winning photographer, producer, and photography mentor based in Berlin and Istanbul. Since 2005, he has worked in the fields of commercial photography, portraiture, fashion, and fine art; he has taught more than 6,000 students. He served as a Sony Europe Imaging Ambassador from 2018 to 2026.

20+ years Professional photography experience
6.000+ Photographer receiving training
Berlin · Istanbul In-person and online education